[*]
A completely free kernel-level memory reading and writing tool, which can break through the process-driven protection and force the application layer to read and write arbitrary process memory data. The driver tool currently supports reading and writing integers, bytes, byte sets, single-precision floating-point numbers, and double-precision Floating-point numbers, multi-level offset reading and writing, module address fetching, remote memory allocation and other functions, high reading and writing efficiency, fast speed, good compatibility, need to be signed by yourself or in test mode when using.
disclaimer
This project is only used for security technology research and exchange. It is prohibited to use for illegal reading and writing or to break through the protection of online game drivers. It cannot be used for commercial purposes. I do not assume any legal responsibility. Also, don’t compare my drivers with commercial drivers. After all That is charged by the day. I am selfless and dedicated only to order a Start to make friends. Please do not repackage and sell my works. The security circle is so small. I am lucky to see you in the future. We are still fellow villagers. Two tears woof woof.
C++ calling interface
The read and write functions currently supported by the driver are shown in the table below. It should be noted thatSwitchDriverIt does not exist in the basic version. If you want to use it, please purchase the Pro professional version. The only difference between the professional version and the basic version is in the way of reading and writing. The professional version has a stronger reading and writing mode, while the basic version only supports Cr3 reading and writing. model;
| export function | function |
|---|---|
| BOOL SwitchDriver(PCHAR pSwitch) | Switch memory module mode (Pro) |
| BOOL SetPid(DWORD Pid) | Set the global process PID |
| BOOL Read(ULONG64 address, T* ret) | custom read memory |
| BOOL Write(ULONG64 address, T data) | custom read memory |
| BOOL ReadMemoryDWORD(ULONG64 addre, DWORD * ret) | Read memory DWORD |
| BOOL ReadMemoryDWORD64(ULONG64 addre, DWORD64 * ret) | Read memory DWORD64 |
| BOOL ReadMemoryBytes(ULONG64 addre, BYTE **ret, DWORD sizes) | read memory bytes |
| BOOL ReadMemoryFloat(ULONG64 addre, float* ret) | Read floating point numbers from memory |
| BOOL ReadMemoryDouble(ULONG64 addre, double* ret) | Read memory double-precision floating-point number |
| BOOL WriteMemoryBytes(ULONG64 addre, BYTE * data, DWORD sizes) | write memory bytes |
| BOOL WriteMemoryDWORD(ULONG64 addre, DWORD ret) | Write memory DWORD |
| BOOL WriteMemoryDWORD64(ULONG64 addre, DWORD64 ret) | Write memory DWORD64 |
| BOOL WriteMemoryFloat(ULONG64 addre, float ret) | Write floating point numbers to memory |
| BOOL WriteMemoryDouble(ULONG64 addre, double ret) | Write memory double-precision floating-point number |
| DWORD ReadDeviationMemory32(ProcessDeviationMemory *read_offset_struct) | Calculate the 32-bit offset data base address |
| DWORD64 ReadDeviationMemory64(ProcessDeviationMemory *read_offset_struct) | Calculate 64-bit offset data base address |
| DWORD64 GetModuleAddress(std::string dllname) | The driver reads the base address of the process module |
| DWORD64 GetSystemRoutineAddress(std::string funcname) | Get system function memory address |
| DWORD64 CreateRemoteMemory(DWORD length) | Allocate memory space on the peer |
| DWORD DeleteRemoteMemory(DWORD64 address, DWORD length) | Destroy peer memory |
The new version of the read and write API interface needs to set the process PID number in advance before reading and writing the memory, and the later call will not need to pass in the process PID. This kind of reading and writing is suitable for long-term reading. The character array of some FPS shooting games, 3D class Since the coordinates of the game will move frequently, it needs to be read continuously without interruption. This read-write module will be very suitable. Next, we will analyze and simply use these API interfaces to realize the functions.
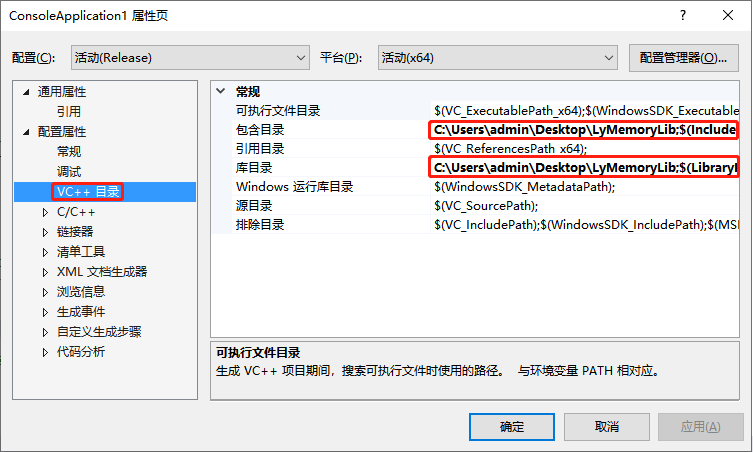
In useLyMemoryLibPlease make sure you have correctly configured the static library beforeVisual StudioReference the header file.
How to install and uninstall the driver: The first step of reading and writing is to install the driver and run it. Of course, you can install the driver through third-party components, or useLyMemoryLibThe function in is installed, and the following is throughLyMemoryLib.hppLoad the full implementation of the driver;
// 署名权
// right to sign one's name on a piece of work
// PowerBy: LyShark
// Email: me@lyshark.com

#include "LyMemoryLib.h"
#include <Windows.h>
#include <iostream>

#pragma comment(lib,"advapi32.lib")
#pragma comment(lib,"LyMemoryLib.lib")

// 安装驱动
BOOL InstallDriver(LyMemoryDrvCtrl Memory)
{
	char szSysFile[MAX_PATH] = { 0 };
	char szSvcLnkName[] = "LyMemory";;
	BOOL ref = FALSE;
	DWORD index = 0;

	// 获取完整路径
	Memory.GetAppPath(szSysFile);
	strcat_s(szSysFile, "LyMemory.sys");
	printf("驱动路径: %s \n", szSysFile);
	index = index + 1;

	// 安装驱动
	ref = Memory.Install(szSysFile, szSvcLnkName, szSvcLnkName);
	printf("安装状态: %d \n", ref);
	index = index + 1;

	// 启动驱动
	ref = Memory.Start();
	printf("启动状态: %d \n", ref);
	index = index + 1;

	// 打开
	ref = Memory.Open("\\\\.\\LyMemory");
	printf("打开状态: %d \n", ref);
	index = index + 1;

	if (index == 4 && ref == TRUE)
	{
		return TRUE;
	}
	return FALSE;
}

// 卸载驱动
BOOL RemoveDriver(LyMemoryDrvCtrl Memory)
{
	BOOL ref = 0;

	// 关闭
	ref = Memory.Stop();
	printf("关闭状态: %d \n", ref);

	// 移除
	ref = Memory.Remove();
	printf("移除状态: %d \n", ref);

	return ref;
}

int main(int argc, char* argv[])
{
	LyMemoryDrvCtrl DriveControl;

	// 加载驱动
	BOOL ref = InstallDriver(DriveControl);
	if (ref == TRUE)
	{
		printf("[*] 驱动已加载 \n");
	}

	// 卸载驱动
	RemoveDriver(DriveControl);

	system("pause");
	return 0;
}
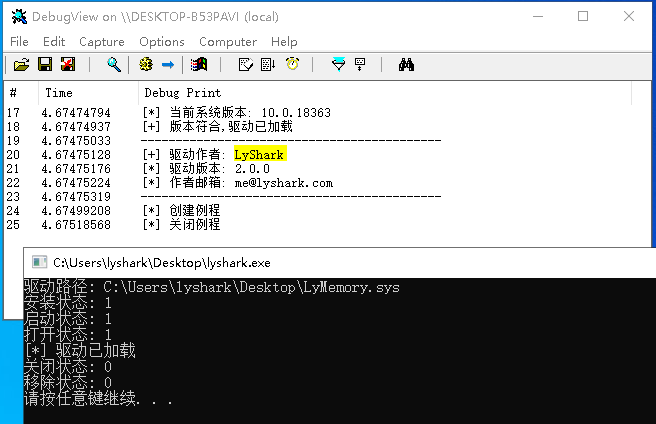
After the above code is compiled and run with administrator privileges, the driver will beLyMemory.sysAutomatically load, and output the information shown in the figure below on the debug board;
Set the PID process binding: If you need to use read and write functions, the first step is to set进程PIDBinding, usually viaSetPid(DWORD Pid)function passed to the processPIDPerform the binding operation. Once the process is bound, there is no need to open it again, which improves the read and write efficiency, and can also prevent multiple attachments and detachments from causing application layer exceptions. If you need to use the setting PID, you can write it like this;
// 署名权
// right to sign one's name on a piece of work
// PowerBy: LyShark
// Email: me@lyshark.com

#include "LyMemoryLib.h"
#include <Windows.h>
#include <iostream>

#pragma comment(lib,"advapi32.lib")
#pragma comment(lib,"LyMemoryLib.lib")

int main(int argc, char *argv[])
{
	LyMemoryDrvCtrl DriveControl;

	DriveControl.InstallAndRun();

	BOOL set_pid = DriveControl.SetPid(6536);
	if (set_pid == TRUE)
	{
		printf("[*] 设置PID = %d \n", set_pid);
	}

	system("pause");
	return 0;
}
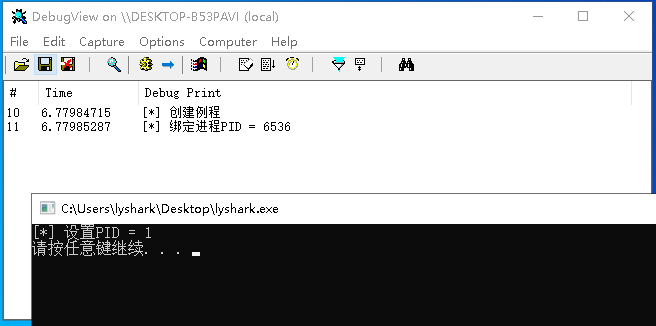
Running the above code will automatically bind to the process6536And output the binding status, as shown in the figure below;
The kernel reads the module base address: Since the current process has been attached to the driver, you can callGetModuleAddress()Get the base address of a specific module in the process, this function receives a module name;
// 署名权
// right to sign one's name on a piece of work
// PowerBy: LyShark
// Email: me@lyshark.com

#include "LyMemoryLib.h"
#include <Windows.h>
#include <iostream>

#pragma comment(lib,"advapi32.lib")
#pragma comment(lib,"LyMemoryLib.lib")

int main(int argc, char *argv[])
{
	LyMemoryDrvCtrl DriveControl;

	DriveControl.InstallAndRun();

	BOOL set_pid = DriveControl.SetPid(6536);
	if (set_pid == TRUE)
	{
		printf("[*] 设置PID = %d \n", set_pid);
	}

	// 取模块基址
	DWORD64 user32 = DriveControl.GetModuleAddress("user32.dll");
	printf("user32 = 0x%p \n", user32);

	DWORD64 kernel32 = DriveControl.GetModuleAddress("kernel32.dll");
	printf("kernel32 = 0x%p \n", kernel32);

	system("pause");
	return 0;
}
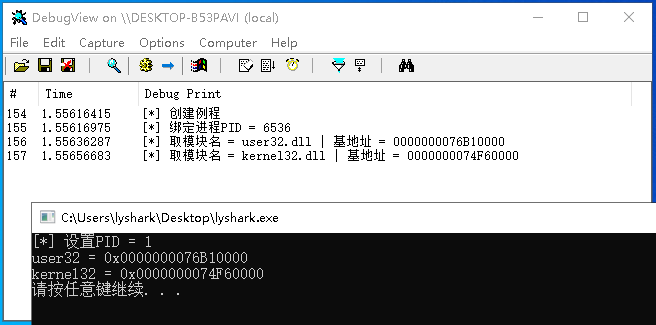
Compile and run the above code, then take out the attached processuser32.dllas well askernel32.dllThe base address of the module, the output effect diagram is as follows;
Get the kernel function base address: Similar to taking the base address of the application layer module, the functionGetSystemRoutineAddressCan be used to get the memory base address of a specific exported function in a kernel module.
// 署名权
// right to sign one's name on a piece of work
// PowerBy: LyShark
// Email: me@lyshark.com

#include "LyMemoryLib.h"
#include <Windows.h>
#include <iostream>

#pragma comment(lib,"advapi32.lib")
#pragma comment(lib,"LyMemoryLib.lib")

int main(int argc, char *argv[])
{
	LyMemoryDrvCtrl DriveControl;

	DriveControl.InstallAndRun();

	BOOL set_pid = DriveControl.SetPid(6536);
	if (set_pid == TRUE)
	{
		printf("[*] 设置PID = %d \n", set_pid);
	}

	// 取函数地址
	CHAR *SzFunction[3] = { "NtReadFile", "NtClose", "NtSetEvent" };

	for (size_t i = 0; i < 3; i++)
	{
		DWORD64 ptr = DriveControl.GetSystemRoutineAddress(SzFunction[i]);
		printf("函数 = %s | 地址 = 0x%p \n", SzFunction[i], ptr);
	}

	system("pause");
	return 0;
}
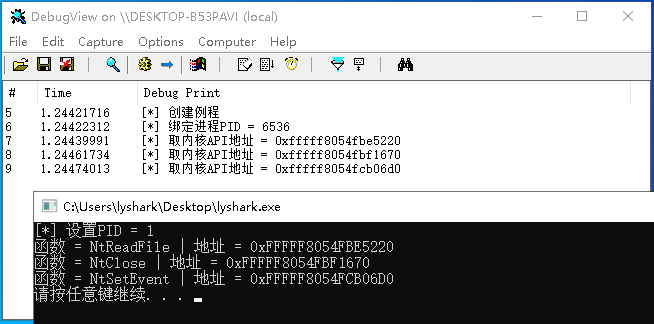
Run the code snippet shown above, it will be automatically taken out"NtReadFile", "NtClose", "NtSetEvent"The memory addresses of the three functions, the output effect diagram is as follows;
Allocate and free heap space: Open up a section of memory in the peer memory that can be calledCreateRemoteMemoryFunction implementation, freeing the heap space can be calledDeleteRemoteMemoryFunction, by default, the allocated space has its own read-write execution attribute, which isHook挂钩Turning offers possibilities.
// 署名权
// right to sign one's name on a piece of work
// PowerBy: LyShark
// Email: me@lyshark.com

#include "LyMemoryLib.h"
#include <Windows.h>
#include <iostream>

#pragma comment(lib,"advapi32.lib")
#pragma comment(lib,"LyMemoryLib.lib")

int main(int argc, char *argv[])
{
	LyMemoryDrvCtrl DriveControl;

	DriveControl.InstallAndRun();

	BOOL set_pid = DriveControl.SetPid(6536);
	if (set_pid == TRUE)
	{
		printf("[*] 设置PID = %d \n", set_pid);
	}

	// 分配内存空间
	DWORD64 address = DriveControl.CreateRemoteMemory(1024);
	printf("[+] 已分配内存 = 0x%p \n", address);

	// 释放内存
	BOOL del = DriveControl.DeleteRemoteMemory(address, 1024);
	if (del == TRUE)
	{
		printf("[-] 内存空间 0x%p 已被释放 \n", address);
	}

	system("pause");
	return 0;
}
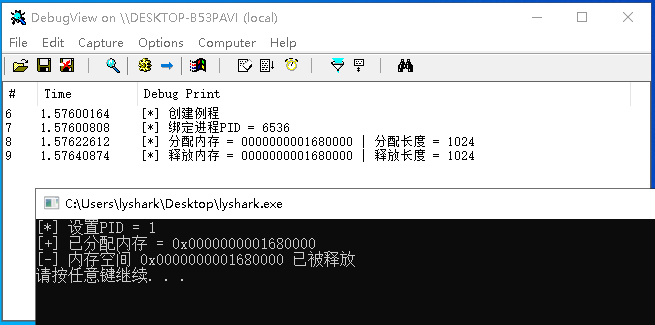
After the above code snippet is run, it will be allocated in the peer memoryaddressaddress, it will be released automatically after allocation, and the output effect diagram is as follows;
Read/write memory integer type: read callable for integer typesReadMemoryDWORDTo read a 32-bit integer, callReadMemoryDWORD64Then read 64-bit integer type;
// 署名权
// right to sign one's name on a piece of work
// PowerBy: LyShark
// Email: me@lyshark.com

#include "LyMemoryLib.h"
#include <Windows.h>
#include <iostream>

#pragma comment(lib,"advapi32.lib")
#pragma comment(lib,"LyMemoryLib.lib")

int main(int argc, char *argv[])
{
	LyMemoryDrvCtrl DriveControl;

	DriveControl.InstallAndRun();

	BOOL set_pid = DriveControl.SetPid(6536);
	if (set_pid == TRUE)
	{
		printf("[*] 设置PID = %d \n", set_pid);
	}

	// 读取32位整数
	DWORD read_value = 0;

	BOOL read_flag = DriveControl.ReadMemoryDWORD(0x0188F828, &read_value);
	if (read_flag == TRUE)
	{
		printf("[*] 读取32位数据 = %d \n", read_value);
	}

	// 读取64位整数
	DWORD64 read64_value = 0;

	BOOL read64_flag = DriveControl.ReadMemoryDWORD64(0x0188F828, &read64_value);
	if (read64_flag == TRUE)
	{
		printf("[*] 读取64位数据 = %d \n", read64_value);
	}

	system("pause");
	return 0;
}
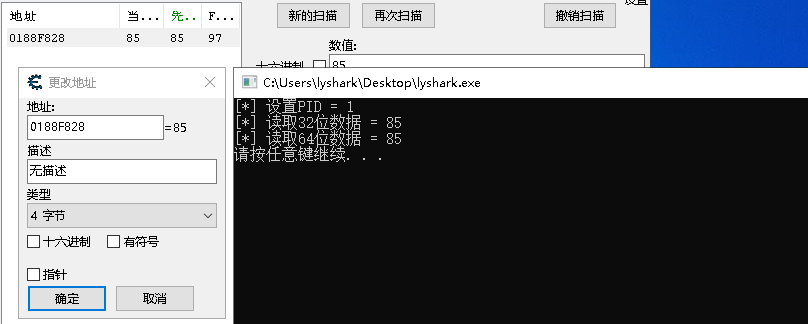
Compile and run the above code snippet, it will read0x0188F828Integer type data at , the read output effect diagram is as follows;
The same is true for writing integer types, callWriteMemoryDWORDTo write out a 32-bit integer, callWriteMemoryDWORD64Write out a 64-bit integer;
// 署名权
// right to sign one's name on a piece of work
// PowerBy: LyShark
// Email: me@lyshark.com

#include "LyMemoryLib.h"
#include <Windows.h>
#include <iostream>

#pragma comment(lib,"advapi32.lib")
#pragma comment(lib,"LyMemoryLib.lib")

int main(int argc, char *argv[])
{
	LyMemoryDrvCtrl DriveControl;

	DriveControl.InstallAndRun();

	BOOL set_pid = DriveControl.SetPid(6536);
	if (set_pid == TRUE)
	{
		printf("[*] 设置PID = %d \n", set_pid);
	}

	// 写入32位整数
	BOOL write32 = DriveControl.WriteMemoryDWORD(0x0188F828, 1000);

	if (write32 == TRUE)
	{
		printf("[+] 写出数据完成 \n");
	}

	// 写入64位整数
	BOOL write64 = DriveControl.WriteMemoryDWORD64(0x0188F828, 2000);

	if (write64 == TRUE)
	{
		printf("[+] 写出数据完成 \n");
	}

	system("pause");
	return 0;
}
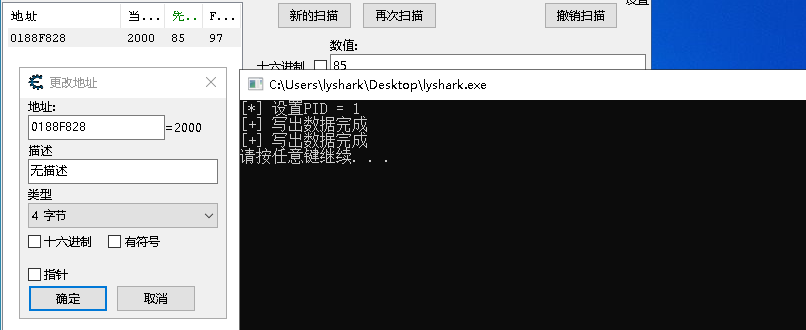
Compile and run the code, and write out to the target process separately1000and2000the code output effect is shown in the figure below;
Read/write memory byte set: Memory read and write byte set callableReadMemoryBytesfunction that writes out a byte set callWriteMemoryBytesfunction;
// 署名权
// right to sign one's name on a piece of work
// PowerBy: LyShark
// Email: me@lyshark.com

#include "LyMemoryLib.h"
#include <Windows.h>
#include <iostream>

#pragma comment(lib,"advapi32.lib")
#pragma comment(lib,"LyMemoryLib.lib")

int main(int argc, char *argv[])
{
	LyMemoryDrvCtrl DriveControl;

	DriveControl.InstallAndRun();

	BOOL set_pid = DriveControl.SetPid(6536);
	if (set_pid == TRUE)
	{
		printf("[*] 设置PID = %d \n", set_pid);
	}

	// 读取字节集
	BYTE buffer[8] = { 0 };
	BYTE* bufferPtr = buffer;

	BOOL flag = DriveControl.ReadMemoryBytes(0x401000, &bufferPtr, sizeof(buffer));

	if (flag == TRUE)
	{
		for (int x = 0; x < 8; x++)
		{
			printf("[+] 读取字节: 0x%x \n", buffer[x]);
		}
	}
	system("pause");
	return 0;
}
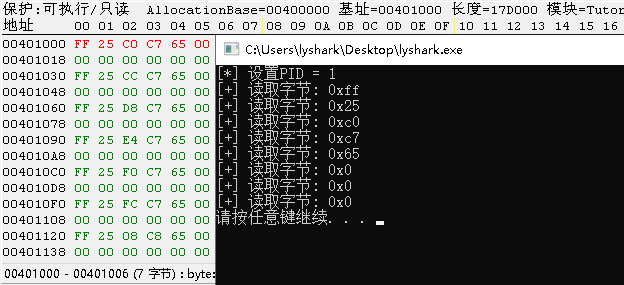
Run the above code snippet, you can in memory0x401000Start reading the byte set at , read 8 bytes backward, and store it inbufferthe output effect diagram is as follows;
Writing a byte set is basically the same as reading it, the functionWriteMemoryBytesIt is used to write byte set data, and a defined byte array needs to be passed to write out;
// 署名权
// right to sign one's name on a piece of work
// PowerBy: LyShark
// Email: me@lyshark.com

#include "LyMemoryLib.h"
#include <Windows.h>
#include <iostream>

#pragma comment(lib,"advapi32.lib")
#pragma comment(lib,"LyMemoryLib.lib")

int main(int argc, char *argv[])
{
	LyMemoryDrvCtrl DriveControl;

	DriveControl.InstallAndRun();

	BOOL set_pid = DriveControl.SetPid(6536);
	if (set_pid == TRUE)
	{
		printf("[*] 设置PID = %d \n", set_pid);
	}

	// 写内存字节集
	BYTE writebuff[4] = { 0x90, 0x90, 0x90, 0x90 };

	BOOL flag = DriveControl.WriteMemoryBytes(0x401000, writebuff, sizeof(writebuff));

	if (flag == TRUE)
	{
		printf("[+] 写出字节集完成 \n");
	}

	system("pause");
	return 0;
}
Run the above code snippet, then write out the byte set to0x401000At the memory, the writing effect is shown in the figure below;
Read/write floating point numbers in memory: Floating point numbers can be divided into single floating point and double floating point, and single floating point can be usedReadMemoryFloatTo achieve reading and writing, double floating point callsReadMemoryDoubleImplementation, the implementation principles of the two are exactly the same, only the width of 4 bytes is increased when reading and writing.
// 署名权
// right to sign one's name on a piece of work
// PowerBy: LyShark
// Email: me@lyshark.com

#include "LyMemoryLib.h"
#include <Windows.h>
#include <iostream>

#pragma comment(lib,"advapi32.lib")
#pragma comment(lib,"LyMemoryLib.lib")

int main(int argc, char *argv[])
{
	LyMemoryDrvCtrl DriveControl;

	DriveControl.InstallAndRun();

	BOOL set_pid = DriveControl.SetPid(6536);
	if (set_pid == TRUE)
	{
		printf("[*] 设置PID = %d \n", set_pid);
	}

	// 读取单浮点
	float read_float = 0;

	BOOL float_flag = DriveControl.ReadMemoryFloat(0x01894EF8, &read_float);
	if (float_flag == TRUE)
	{
		printf("[+] 读取单精度 = %f \n", read_float);
	}

	// 读取双浮点
	double read_double = 0;

	BOOL double_flag = DriveControl.ReadMemoryDouble(0x01894EF8, &read_double);
	if (double_flag == TRUE)
	{
		printf("[+] 读取双精度 = %f \n", double_flag);
	}

	system("pause");
	return 0;
}
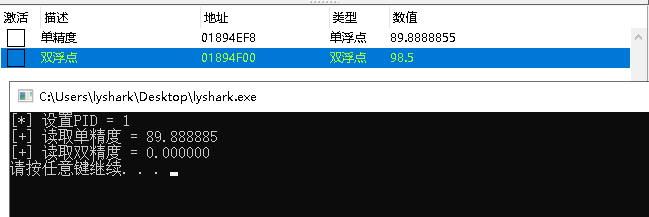
After running, output two floating-point numbers. Note that the double precision here is not an error but an output problem. The effect diagram is as follows;
So how to write out the data, just callWriteMemoryFloatThe purpose of writing floating-point numbers can be achieved;
// 署名权
// right to sign one's name on a piece of work
// PowerBy: LyShark
// Email: me@lyshark.com

#include "LyMemoryLib.h"
#include <Windows.h>
#include <iostream>

#pragma comment(lib,"advapi32.lib")
#pragma comment(lib,"LyMemoryLib.lib")

int main(int argc, char *argv[])
{
	LyMemoryDrvCtrl DriveControl;

	DriveControl.InstallAndRun();

	BOOL set_pid = DriveControl.SetPid(6536);
	if (set_pid == TRUE)
	{
		printf("[*] 设置PID = %d \n", set_pid);
	}

	// 写取单浮点
	BOOL ref = DriveControl.WriteMemoryFloat(0x01894EF8, 100.245);
	if (ref == TRUE)
	{
		printf("[+] 写出数据完成 \n");
	}

	system("pause");
	return 0;
}
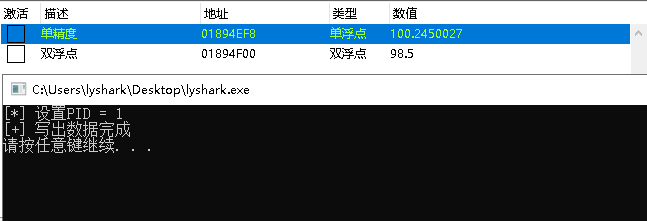
Taking single-precision floating-point numbers as an example, the following effects are output after writing the data;
Calculate multi-level offset dynamic address: functionReadDeviationMemory32It can realize the function of dynamically calculating multi-level offsets. This function can accept up to 32 levels of offset calculations. After the calculation, a dynamic address can be obtained. After the user obtains the dynamic address, he can read and write integers, bytes, and bytes to the address. Set, floating-point numbers and other operations, we take integer reading and writing as an example;
// 署名权
// right to sign one's name on a piece of work
// PowerBy: LyShark
// Email: me@lyshark.com

#include "LyMemoryLib.h"
#include <Windows.h>
#include <iostream>

#pragma comment(lib,"advapi32.lib")
#pragma comment(lib,"LyMemoryLib.lib")

int main(int argc, char *argv[])
{
	LyMemoryDrvCtrl DriveControl;

	DriveControl.InstallAndRun();

	BOOL set_pid = DriveControl.SetPid(6536);
	if (set_pid == TRUE)
	{
		printf("[*] 设置PID = %d \n", set_pid);
	}

	// 计算四级偏移动态地址
	ProcessDeviationMemory read_offset_struct = { 0 };

	read_offset_struct.Address = 0x6566e0;        // 基地址
	read_offset_struct.OffsetSize = 4;            // 偏移长度
	read_offset_struct.Data = 0;                  // 读入的数据
	read_offset_struct.Offset[0] = 0x18;          // 一级偏移
	read_offset_struct.Offset[1] = 0x0;           // 二级偏移
	read_offset_struct.Offset[2] = 0x14;          // 三级偏移
	read_offset_struct.Offset[3] = 0x0c;          // 四级偏移

	// 开始计算
	DWORD BaseAddress = DriveControl.ReadDeviationMemory32(&read_offset_struct);
	printf("[+] 得到动态地址 = 0x%016lx \n", BaseAddress);

	// 读取整数
	DWORD GetDWORD = 0;

	BOOL flag = DriveControl.ReadMemoryDWORD(BaseAddress, &GetDWORD);
	if (flag == TRUE)
	{
		printf("[+] 读取数据 = %d \n", GetDWORD);
	}

	system("pause");
	return 0;
}
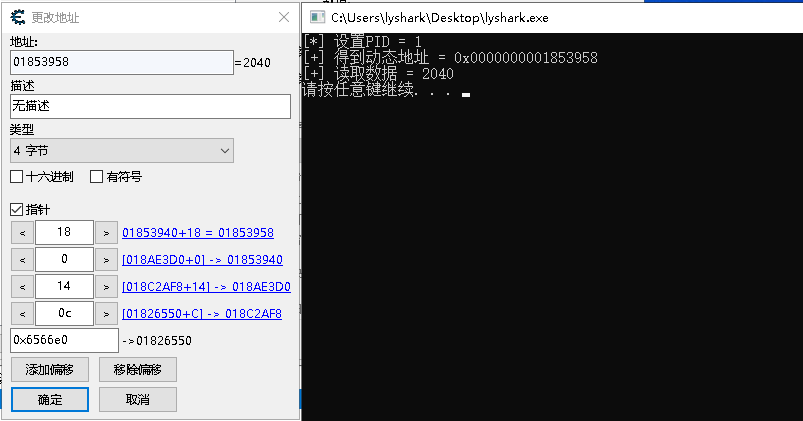
The code above callsReadDeviationMemory32Calculate the base address of the current dynamic address, and passReadMemoryDWORDRead the memory DWORD type here, the output effect is as follows;
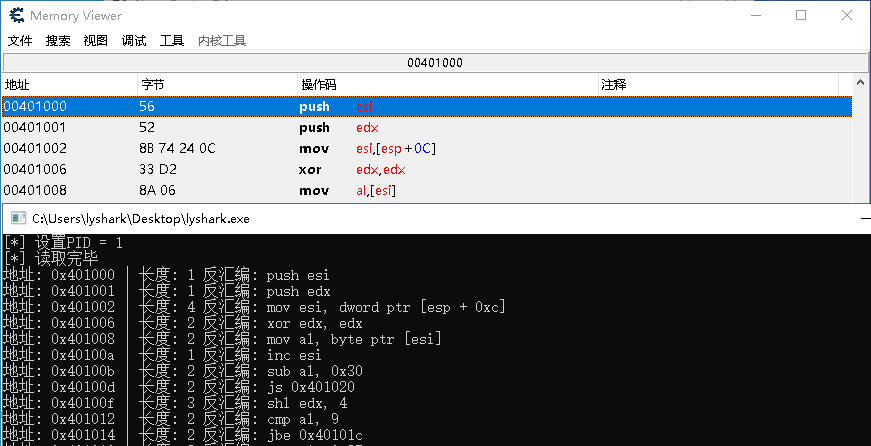
Memory read and write disassembly: Read and write functions we can useReadMemoryBytesTo achieve the reading of the byte set, by usingcapstoneThe disassembly engine can disassemble the specific memory space;
// 署名权
// right to sign one's name on a piece of work
// PowerBy: LyShark
// Email: me@lyshark.com

#include "LyMemoryLib.h"
#include <Windows.h>
#include <iostream>
#include <inttypes.h>
#include <capstone\capstone.h>

#pragma comment(lib,"capstone64.lib")
#pragma comment(lib,"advapi32.lib")
#pragma comment(lib,"LyMemoryLib.lib")

int main(int argc, char *argv[])
{
	LyMemoryDrvCtrl DriveControl;

	DriveControl.InstallAndRun();

	BOOL set_pid = DriveControl.SetPid(5588);
	if (set_pid == TRUE)
	{
		printf("[*] 设置PID = %d \n", set_pid);
	}

	// 读取前1024个字节
	BYTE MyArray[1024] = { 0 };
	BYTE* bufferPtr = MyArray;

	BOOL flag = DriveControl.ReadMemoryBytes(0x401000, &bufferPtr, sizeof(MyArray));

	if (flag == TRUE)
	{
		printf("[*] 读取完毕 \n");
	}

	csh handle;
	cs_insn *insn;
	size_t count;

	int size = 1023;

	// 打开句柄
	if (cs_open(CS_ARCH_X86, CS_MODE_32, &handle) != CS_ERR_OK)
	{
		return 0;
	}

	// 反汇编代码,地址从0x1000开始,返回总条数
	count = cs_disasm(handle, (unsigned char *)MyArray, size, 0x401000, 0, &insn);

	if (count > 0)
	{
		size_t index;
		for (index = 0; index < count; index++)
		{
			/*
			for (int x = 0; x < insn[index].size; x++)
			{
				 printf("机器码: %d -> %02X \n", x, insn[index].bytes[x]);
			}
			*/

			printf("地址: 0x%"PRIx64" | 长度: %d 反汇编: %s %s \n", \
				insn[index].address, insn[index].size, \
				insn[index].mnemonic, insn[index].op_str\
				);
		}

		cs_free(insn, count);
	}
	/*
	else
	{
		printf("反汇编返回长度为空 \n");
	}
	*/

	cs_close(&handle);
	system("pause");
	return 0;
}
In-process0x401000The memory region of the disassembled down1024bytes, the output effect diagram is as follows;
project address
[*]#LyMemory #Homepage #Documentation #Download #Kernel #Level #Memory #Read #Write #Driver #News Fast Delivery
