Author: vivo Internet Server Team – Zhang Peng
SPI is a mechanism for dynamically loading services. Its core idea is decoupling, which is a typical microkernel architecture model. SPI is widely used in the Java world, such as Dubbo, Spring Boot and other frameworks. This article starts with the analysis of the source code, and deeply discusses the characteristics and principles of Java SPI, as well as its application in some more classic fields.
The full name of SPI is Service Provider Interface. It is an API provided by Java and designed to be implemented or extended by a third party. It is a mechanism for dynamically loading services. The main idea of the SPI mechanism in Java is to move the control of assembly out of the program. This mechanism is especially important in modular design, and its core idea is decoupling.
The Java SPI has four elements:
SPI interface:An interface or abstract class that implements the class contract for a service provider.
SPI implementation class:The implementation class that actually provides the service.
SPI configuration:The configuration file agreed by the Java SPI mechanism provides logic for finding service implementation classes. The configuration file must be placed in the META-INF/services directory, and the file name should be consistent with the fully qualified name of the service provider interface. Each line in the file has details of an implementing service class, again the fully qualified name of the service provider class.
ServiceLoader:The core class of Java SPI, used to load the SPI implementation class. There are various utility methods in ServiceLoader to get specific implementations, iterate over them, or reload services.
As the saying goes, true knowledge comes from practice. Let’s take a look at how to use Java SPI through a specific example.
2.1 SPI interface
First, a SPI interface needs to be defined, which is no different from a normal interface.
package io.github.dunwu.javacore.spi;

public interface DataStorage {
    String search(String key);
}
2.2 SPI implementation class
Suppose, we need to use two different data stores in the program – MySQL and Redis. Therefore, we need two different implementation classes to complete the corresponding work respectively.
MySQL query MOCK class
package io.github.dunwu.javacore.spi;

public class MysqlStorage implements DataStorage {
    @Override
    public String search(String key) {
        return "【Mysql】搜索" + key + ",结果:No";
    }
}
Redis query MOCK class
package io.github.dunwu.javacore.spi;

public class RedisStorage implements DataStorage {
    @Override
    public String search(String key) {
        return "【Redis】搜索" + key + ",结果:Yes";
    }
}
The service is passed in the type of SPI interface that it expects to load. So far, defining the interface and implementing the interface are no different from ordinary Java interface implementation.
2.3 SPI configuration
If you want to discover services through the Java SPI mechanism, you need to agree on the logic of discovering services in the SPI configuration. The configuration file must be placed in the META-INF/services directory, and the file name should be consistent with the fully qualified name of the service provider interface. Each line in the file has details of an implementing service class, again the fully qualified name of the service provider class. Take this sample code as an example, the file name should be io.github.dunwu.javacore.spi.DataStorage,
The contents of the file are as follows:
io.github.dunwu.javacore.spi.MysqlStorage
io.github.dunwu.javacore.spi.RedisStorage
2.4 ServiceLoader
After completing the above steps, you can load the service through ServiceLoader. Examples are as follows:
import java.util.ServiceLoader;

public class SpiDemo {

    public static void main(String[] args) {
        ServiceLoader<DataStorage> serviceLoader = ServiceLoader.load(DataStorage.class);
        System.out.println("============ Java SPI 测试============");
        serviceLoader.forEach(loader -> System.out.println(loader.search("Yes Or No")));
    }

}
output:
============ Java SPI 测试============
【Mysql】搜索Yes Or No,结果:No
【Redis】搜索Yes Or No,结果:Yes
Above, we have seen the elements of Java SPI and the ways to use Java SPI. Have you ever wondered how Java SPI differs from normal Java interfaces and how Java SPI works. In fact, the Java SPI mechanism relies on the ServiceLoader class to resolve and load services. Therefore, if you master the workflow of ServiceLoader, you will master the principle of SPI. The code of ServiceLoader itself is very concise. Next, let us understand the workflow of ServiceLoader one by one by reading the source code.
3.1 Member variables of ServiceLoader
Let’s take a look at the member variables of the ServiceLoader class first, and get a general impression, which will be used in the source code later.
public final class ServiceLoader<S> implements Iterable<S> {

    // SPI 配置文件目录
    private static final String PREFIX = "META-INF/services/";

    // 将要被加载的 SPI 服务
    private final Class<S> service;

    // 用于加载 SPI 服务的类加载器
    private final ClassLoader loader;

    // ServiceLoader 创建时的访问控制上下文
    private final AccessControlContext acc;

    // SPI 服务缓存,按实例化的顺序排列
    private LinkedHashMap<String,S> providers = new LinkedHashMap<>();

    // 懒查询迭代器
    private LazyIterator lookupIterator;

    // ...
}
3.2 Workflow of ServiceLoader
(1) ServiceLoader.load static method
When an application loads a Java SPI service, it first calls the ServiceLoader.load static method.
The function of the ServiceLoader.load static method is:
① Specify the class loading ClassLoader and access control context;
② Then, reload the SPI service
- Clear all instantiated SPI services in the cache
- According to ClassLoader and SPI type, create lazy loading iterator
Here, the relevant source code of ServiceLoader.load is extracted, as follows:
// service 传入的是期望加载的 SPI 接口类型
// loader 是用于加载 SPI 服务的类加载器
public static <S> ServiceLoader<S> load(Class<S> service, ClassLoader loader) {
  return new ServiceLoader<>(service, loader);
}

public void reload() {
    // 清空缓存中所有已实例化的 SPI 服务
  providers.clear();
    // 根据 ClassLoader 和 SPI 类型,创建懒加载迭代器
  lookupIterator = new LazyIterator(service, loader);
}

// 私有构造方法
// 重新加载 SPI 服务
private ServiceLoader(Class<S> svc, ClassLoader cl) {
  service = Objects.requireNonNull(svc, "Service interface cannot be null");
    // 指定类加载 ClassLoader 和访问控制上下文
  loader = (cl == null) ? ClassLoader.getSystemClassLoader() : cl;
  acc = (System.getSecurityManager() != null) ? AccessController.getContext() : null;
    // 然后,重新加载 SPI 服务
  reload();
}
(2) The application traverses the SPI instance through the iterator method of ServiceLoader
The class definition of ServiceLoader clarifies that the ServiceLoader class implements Iterable
When the application calls the iterator method of ServiceLoader, ServiceLoader will first determine whether there is data in the cache providers: if there is, it will directly return the iterator of the cache providers; if not, it will return the iterator of the lazy loading iterator.
public Iterator<S> iterator() {
  return new Iterator<S>() {

        // 缓存 SPI providers
    Iterator<Map.Entry<String,S>> knownProviders
      = providers.entrySet().iterator();

        // lookupIterator 是 LazyIterator 实例,用于懒加载 SPI 实例
    public boolean hasNext() {
      if (knownProviders.hasNext())
        return true;
      return lookupIterator.hasNext();
    }

    public S next() {
      if (knownProviders.hasNext())
        return knownProviders.next().getValue();
      return lookupIterator.next();
    }

    public void remove() {
      throw new UnsupportedOperationException();
    }

  };
}
(3) Workflow of lazy loading iterators
As mentioned in the source code above, lookupIterator is an instance of LazyIterator, and LazyIterator is used to lazy load SPI instances. So, how does LazyIterator work?
Here, extract the key code of LazyIterator
hasNextService method:
- stitching META-INF/services/ + Fully qualified name of the SPI interface
- Through the class loader, try to load the resource file
- Parse the content in the resource file to obtain the fully qualified name nextName of the implementation class of the SPI interface
nextService method:
- The hasNextService() method parses out the fully qualified name nextName of the SPI implementation class, and obtains the class definition Class of the SPI implementation class through reflection.
- Then, try to instantiate an SPI service object through the newInstance method of Class. If successful, this object is added to the cache providers and the object is returned.
private boolean hasNextService() {
  if (nextName != null) {
    return true;
  }
  if (configs == null) {
    try {
            // 1.拼接 META-INF/services/ + SPI 接口全限定名
            // 2.通过类加载器,尝试加载资源文件
            // 3.解析资源文件中的内容
      String fullName = PREFIX + service.getName();
      if (loader == null)
        configs = ClassLoader.getSystemResources(fullName);
      else
        configs = loader.getResources(fullName);
    } catch (IOException x) {
      fail(service, "Error locating configuration files", x);
    }
  }
  while ((pending == null) || !pending.hasNext()) {
    if (!configs.hasMoreElements()) {
      return false;
    }
    pending = parse(service, configs.nextElement());
  }
  nextName = pending.next();
  return true;
}

private S nextService() {
  if (!hasNextService())
    throw new NoSuchElementException();
  String cn = nextName;
  nextName = null;
  Class<?> c = null;
  try {
    c = Class.forName(cn, false, loader);
  } catch (ClassNotFoundException x) {
    fail(service,
       "Provider " + cn + " not found");
  }
  if (!service.isAssignableFrom(c)) {
    fail(service,
       "Provider " + cn  + " not a s");
  }
  try {
    S p = service.cast(c.newInstance());
    providers.put(cn, p);
    return p;
  } catch (Throwable x) {
    fail(service,
       "Provider " + cn + " could not be instantiated",
       x);
  }
  throw new Error();          // This cannot happen
}
3.3 SPI and class loaders
By reading the ServiceLoader code in the above two chapters, we have a general understanding of the working principle of Java SPI, that is, loading the SPI configuration file through ClassLoader, parsing the SPI service, and then instantiating the SPI service instance through reflection. Let’s think about it, why do we need to specify the class loader ClassLoader when loading the SPI service?
Readers who have studied the JVM must have known about the class loaderParental Delegation Model(Parents Delegation Model). The parental delegation model requires that all class loaders except the top-level BootstrapClassLoader should have their own parent class loader. Here, the parent-child relationship between class loaders is generally realized through a combination (Composition) relationship rather than an inheritance (Inheritance) relationship.
The parent delegation mechanism agrees:A class loader first passes the class loading request to the parent class loader, and only tries to load if the parent class loader cannot complete the class loading request.
Benefits of parental delegation:The Java class, along with its class loader, naturally has a hierarchical relationship with priority, so that the class loading is unified and there will be no problem of repeated loading:
- System classes prevent multiple copies of the same bytecode from appearing in memory
- Ensure the safe and stable operation of Java programs
For example: java.lang.Object is stored in rt.jar, if you write another java.lang.Object class and put it in the classpath, the program can be compiled and passed. Because of the existence of the parent delegation model, the Object in rt.jar has a higher priority than the Object in the classpath, because the Object in rt.jar uses the startup class loader, and the Object in the classpath uses the application Program class loader. Just because the Object in rt.jar has a higher priority, because all the Objects in the program are this Object.
Restrictions on parental delegation:The child class loader can use the classes already loaded by the parent class loader, but the parent class loader cannot use the classes already loaded by the child class loader. – This leads to the fact that the parental delegation model cannot solve all class loader problems. Java SPI faces such a problem:
- The SPI interface is part of the Java core library and is loaded by BootstrapClassLoader;
- The Java class implemented by SPI is generally loaded by AppClassLoader. BootstrapClassLoader cannot find the implementation class of SPI, because it only loads the core library of Java. It also cannot proxy to AppClassLoader since it is the topmost class loader. This also explains the question at the beginning of this section – why does it need to specify the class loader ClassLoader when loading the SPI service? Because if the ClassLoader is not specified, the SPI service cannot be obtained.
If you do not make any settings, the context class loader of the thread of the Java application defaults to AppClassLoader. When the core class library uses the SPI interface, the passed class loader uses the thread context class loader, and the class implemented by SPI can be successfully loaded. Thread context class loaders are used in many SPI implementations.
Usually the thread context class loader can be obtained through Thread.currentThread().getClassLoader() and Thread.currentThread().getContextClassLoader().
3.4 Shortcomings of Java SPI
Java SPI has some disadvantages:
- It cannot be loaded on demand, and all implementations need to be traversed and instantiated, and then the implementation we need can be found in the loop. If you don’t want to use some implementation class, or if some class instantiation is time-consuming, it is also loaded and instantiated, which causes waste.
- The way to obtain a certain implementation class is not flexible enough, it can only be obtained in the form of Iterator, and the corresponding implementation class cannot be obtained according to a certain parameter.
- It is not safe for multiple concurrent multithreaded instances of the ServiceLoader class to use.
SPI is widely used in Java development. First of all, many SPI interfaces are agreed in the java.util.spi package of Java. Below, some SPI interfaces are listed:
In addition, SPI has many applications, and a few classic cases are listed below.
4.1 JDBC DriverManager of SPI application case
As a Java engineer, especially a CRUD engineer, you must be very familiar with JDBC. As we all know, there are many kinds of relational databases, such as: MySQL, Oracle, PostgreSQL and so on. How does JDBC identify the drivers of various databases?
4.1.1 Create a database connection
Let’s review first, how does JDBC create a database connection?
Before JDBC4.0, when connecting to the database, the Class.forName(XXX) method is usually used to load the corresponding driver of the database, and then obtain the database connection, and then perform CRUD and other operations.
Class.forName("com.mysql.jdbc.Driver")After JDBC4.0, it is no longer necessary to use the Class.forName(XXX) method to load the database driver, and just obtain the connection directly. Obviously, this is convenient, but how?
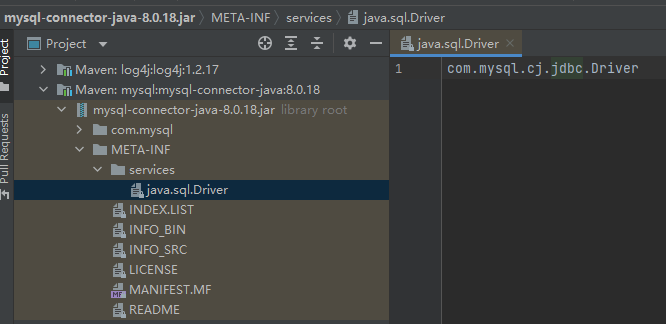
(1) JDBC interface:First, the interface java.sql.Driver is built into Java.
(2) JDBC interface implementation:The drivers of each database implement the java.sql.Driver interface by themselves to manage database connections.
com.mysql.cj.jdbc.Driver is the MySQL implementation of java.sql.Driver. As shown below:
(3) Create a database connection
Taking MySQL as an example, the code to create a database connection is as follows:
final String DB_URL = String.format("jdbc:mysql://%s:%s/%s", DB_HOST, DB_PORT, DB_SCHEMA);
connection = DriverManager.getConnection(DB_URL, DB_USER, DB_PASSWORD);
4.1.2 DriverManager
From the previous article, we already know that DriverManager is the key to create a database connection. How exactly does it work?
You can see that the instantiated driver is loaded, and then look at the loadInitialDrivers method:
private static void loadInitialDrivers() {
  String drivers;
  try {
    drivers = AccessController.doPrivileged(new PrivilegedAction<String>() {
      public String run() {
        return System.getProperty("jdbc.drivers");
      }
    });
  } catch (Exception ex) {
    drivers = null;
  }
  // 通过 classloader 获取所有实现 java.sql.Driver 的驱动类
  AccessController.doPrivileged(new PrivilegedAction<Void>() {
    public Void run() {
            // 利用 SPI,记载所有 Driver 服务
      ServiceLoader<Driver> loadedDrivers = ServiceLoader.load(Driver.class);
            // 获取迭代器
      Iterator<Driver> driversIterator = loadedDrivers.iterator();
      try{
                // 遍历迭代器
        while(driversIterator.hasNext()) {
          driversIterator.next();
        }
      } catch(Throwable t) {
      // Do nothing
      }
      return null;
    }
  });

    // 打印数据库驱动信息
  println("DriverManager.initialize: jdbc.drivers = " + drivers);

  if (drivers == null || drivers.equals("")) {
    return;
  }
  String[] driversList = drivers.split(":");
  println("number of Drivers:" + driversList.length);
  for (String aDriver : driversList) {
    try {
      println("DriverManager.Initialize: loading " + aDriver);
            // 尝试实例化驱动
      Class.forName(aDriver, true,
          ClassLoader.getSystemClassLoader());
    } catch (Exception ex) {
      println("DriverManager.Initialize: load failed: " + ex);
    }
  }
}
The main steps of the above code are:
- Obtain the driver’s implementation class from system variables.
- Use SPI to obtain the implementation classes of all drivers.
- Traverse all drivers and try to instantiate each implementation class.
- Instantiate the specific implementation class according to the driver list obtained in the first step.
What needs attention is the following line of code:
ServiceLoader<Driver> loadedDrivers = ServiceLoader.load(Driver.class);What is actually obtained here is the java.util.ServiceLoader.LazyIterator iterator. When calling its hasNext method, it will search the META-INF/services directory in the classpath and jar package, find the java.sql.Driver file, and find the fully qualified name of the driver implementation class in the file. When calling its next method, it will try to instantiate an object of the driver class according to the fully qualified name of the driver class.
4.2 Common-Loggin of SPI application case
common-logging (also known as Jakarta Commons Logging, abbreviated as JCL) is a commonly used log facade toolkit. The core class of common-logging is LogFactory, which is an abstract class responsible for loading specific log implementations.
Its entry method is the LogFactory.getLog method, and the source code is as follows:
public static Log getLog(Class clazz) throws LogConfigurationException {
  return getFactory().getInstance(clazz);
}

public static Log getLog(String name) throws LogConfigurationException {
  return getFactory().getInstance(name);
}
As can be seen from the above source code, getLog adopts the factory design pattern, which is to call the getFactory method to obtain the factory class of the specific log library, and then create a log instance according to the class name or type.
The LogFatory.getFactory method is responsible for selecting the matching log factory, and its source code is as follows:
public static LogFactory getFactory() throws LogConfigurationException {
  // 省略...

  // 加载 commons-logging.properties 配置文件
  Properties props = getConfigurationFile(contextClassLoader, FACTORY_PROPERTIES);

  // 省略...

    // 决定创建哪个 LogFactory 实例
  // (1)尝试读取全局属性 org.apache.commons.logging.LogFactory
  if (isDiagnosticsEnabled()) {
    logDiagnostic("[LOOKUP] Looking for system property [" + FACTORY_PROPERTY +
            "] to define the LogFactory subclass to use...");
  }

  try {
        // 如果指定了 org.apache.commons.logging.LogFactory 属性,尝试实例化具体实现类
    String factoryClass = getSystemProperty(FACTORY_PROPERTY, null);
    if (factoryClass != null) {
      if (isDiagnosticsEnabled()) {
        logDiagnostic("[LOOKUP] Creating an instance of LogFactory class '" + factoryClass +
                "' as specified by system property " + FACTORY_PROPERTY);
      }
      factory = newFactory(factoryClass, baseClassLoader, contextClassLoader);
    } else {
      if (isDiagnosticsEnabled()) {
        logDiagnostic("[LOOKUP] No system property [" + FACTORY_PROPERTY + "] defined.");
      }
    }
  } catch (SecurityException e) {
      // 异常处理
  } catch (RuntimeException e) {
      // 异常处理
  }

    // (2)利用 Java SPI 机制,尝试在 classpatch 的 META-INF/services 目录下寻找 org.apache.commons.logging.LogFactory 实现类
  if (factory == null) {
    if (isDiagnosticsEnabled()) {
      logDiagnostic("[LOOKUP] Looking for a resource file of name [" + SERVICE_ID +
              "] to define the LogFactory subclass to use...");
    }
    try {
      final InputStream is = getResourceAsStream(contextClassLoader, SERVICE_ID);

      if( is != null ) {
        // This code is needed by EBCDIC and other strange systems.
        // It's a fix for bugs reported in xerces
        BufferedReader rd;
        try {
          rd = new BufferedReader(new InputStreamReader(is, "UTF-8"));
        } catch (java.io.UnsupportedEncodingException e) {
          rd = new BufferedReader(new InputStreamReader(is));
        }

        String factoryClassName = rd.readLine();
        rd.close();

        if (factoryClassName != null && ! "".equals(factoryClassName)) {
          if (isDiagnosticsEnabled()) {
            logDiagnostic("[LOOKUP]  Creating an instance of LogFactory class " +
                    factoryClassName +
                    " as specified by file '" + SERVICE_ID +
                    "' which was present in the path of the context classloader.");
          }
          factory = newFactory(factoryClassName, baseClassLoader, contextClassLoader );
        }
      } else {
        // is == null
        if (isDiagnosticsEnabled()) {
          logDiagnostic("[LOOKUP] No resource file with name '" + SERVICE_ID + "' found.");
        }
      }
    } catch (Exception ex) {
      // note: if the specified LogFactory class wasn't compatible with LogFactory
      // for some reason, a ClassCastException will be caught here, and attempts will
      // continue to find a compatible class.
      if (isDiagnosticsEnabled()) {
        logDiagnostic(
          "[LOOKUP] A security exception occurred while trying to create an" +
          " instance of the custom factory class" +
          ": [" + trim(ex.getMessage()) +
          "]. Trying alternative implementations...");
      }
      // ignore
    }
  }

  // (3)尝试从 classpath 目录下的 commons-logging.properties 文件中查找 org.apache.commons.logging.LogFactory 属性

  if (factory == null) {
    if (props != null) {
      if (isDiagnosticsEnabled()) {
        logDiagnostic(
          "[LOOKUP] Looking in properties file for entry with key '" + FACTORY_PROPERTY +
          "' to define the LogFactory subclass to use...");
      }
      String factoryClass = props.getProperty(FACTORY_PROPERTY);
      if (factoryClass != null) {
        if (isDiagnosticsEnabled()) {
          logDiagnostic(
            "[LOOKUP] Properties file specifies LogFactory subclass '" + factoryClass + "'");
        }
        factory = newFactory(factoryClass, baseClassLoader, contextClassLoader);

        // TODO: think about whether we need to handle exceptions from newFactory
      } else {
        if (isDiagnosticsEnabled()) {
          logDiagnostic("[LOOKUP] Properties file has no entry specifying LogFactory subclass.");
        }
      }
    } else {
      if (isDiagnosticsEnabled()) {
        logDiagnostic("[LOOKUP] No properties file available to determine" + " LogFactory subclass from..");
      }
    }
  }

  // (4)以上情况都不满足,实例化默认实现类 org.apache.commons.logging.impl.LogFactoryImpl

  if (factory == null) {
    if (isDiagnosticsEnabled()) {
      logDiagnostic(
        "[LOOKUP] Loading the default LogFactory implementation '" + FACTORY_DEFAULT +
        "' via the same classloader that loaded this LogFactory" +
        " class (ie not looking in the context classloader).");
    }

    factory = newFactory(FACTORY_DEFAULT, thisClassLoader, contextClassLoader);
  }

  if (factory != null) {
    /**
     * Always cache using context class loader.
     */
    cacheFactory(contextClassLoader, factory);

    if (props != null) {
      Enumeration names = props.propertyNames();
      while (names.hasMoreElements()) {
        String name = (String) names.nextElement();
        String value = props.getProperty(name);
        factory.setAttribute(name, value);
      }
    }
  }

  return factory;
}
As can be seen from the source code of the getFactory method, its core logic is divided into 4 steps:
- First, try to look up the global property org.apache.commons.logging.LogFactory, and if a concrete class is specified, try to create an instance.
- Using the Java SPI mechanism, try to find the implementation class of org.apache.commons.logging.LogFactory in the META-INF/services directory of classpatch.
- Attempts to find the org.apache.commons.logging.LogFactory property from the commons-logging.properties file in the classpath directory, and attempts to create an instance if a concrete class is specified.
- If none of the above conditions are met, instantiate the default implementation class, namely org.apache.commons.logging.impl.LogFactoryImpl.
4.3 Spring Boot of SPI application case
Spring Boot is a framework based on Spring, which is designed to simplify the configuration and operation of Spring applications. In Spring Boot, autowiring is heavily used to minimize configuration.
The following is an example of Spring Boot entry, as you can see, the code is very concise.
import org.springframework.boot.SpringApplication;
import org.springframework.boot.autoconfigure.SpringBootApplication;
import org.springframework.web.bind.annotation.GetMapping;
import org.springframework.web.bind.annotation.RequestParam;
import org.springframework.web.bind.annotation.RestController;

@SpringBootApplication
@RestController
public class DemoApplication {

    public static void main(String[] args) {
        SpringApplication.run(DemoApplication.class, args);
    }

    @GetMapping("/hello")
    public String hello(@RequestParam(value = "name", defaultValue = "World") String name) {
        return String.format("Hello %s!", name);
    }
}
So, how Spring Boot can run a Spring Boot application with just a few lines of code. We might as well start with the source code with doubts and explore its principles step by step.
4.3.1 @SpringBootApplication annotation
First of all, the startup class of the Spring Boot application will be marked with a
@SpringBootApplication annotation.
The @SpringBootApplication annotation is defined as follows:
@Target({ElementType.TYPE})
@Retention(RetentionPolicy.RUNTIME)
@Documented
@Inherited
@SpringBootConfiguration
@EnableAutoConfiguration
@ComponentScan(
    excludeFilters = {@Filter(
    type = FilterType.CUSTOM,
    classes = {TypeExcludeFilter.class}
), @Filter(
    type = FilterType.CUSTOM,
    classes = {AutoConfigurationExcludeFilter.class}
)}
)
public @interface SpringBootApplication {
    // 略
}
In addition to the meta-annotations @Target, @Retention, @Documented, @Inherited,
The definition of the @SpringBootApplication annotation also marks three annotations @SpringBootConfiguration, @EnableAutoConfiguration, and @ComponentScan.
4.3.2 @SpringBootConfiguration annotation
From the definition of the @SpringBootConfiguration annotation, the @SpringBootConfiguration annotation is essentially a @Configuration annotation, which means that the class decorated with the @SpringBootConfiguration annotation will be recognized by Spring Boot as a configuration class.
@Target({ElementType.TYPE})
@Retention(RetentionPolicy.RUNTIME)
@Documented
@Configuration
public @interface SpringBootConfiguration {
    @AliasFor(
        annotation = Configuration.class
    )
    boolean proxyBeanMethods() default true;
}
4.3.3 @EnableAutoConfiguration annotation
The @EnableAutoConfiguration annotation is defined as follows:
@Target({ElementType.TYPE})
@Retention(RetentionPolicy.RUNTIME)
@Documented
@Inherited
@AutoConfigurationPackage
@Import({AutoConfigurationImportSelector.class})
public @interface EnableAutoConfiguration {
    String ENABLED_OVERRIDE_PROPERTY = "spring.boot.enableautoconfiguration";

    Class<?>[] exclude() default {};

    String[] excludeName() default {};
}
The @EnableAutoConfiguration annotation includes @AutoConfigurationPackage and @Import({AutoConfigurationImportSelector.class}) two annotations.
4.3.4 @AutoConfigurationPackage annotation
@AutoConfigurationPackage will use the modified class as the main configuration class, and the package where the class is located will be regarded as the root path. By default, Spring Boot will automatically scan all Spring Beans under the root path (defined by @Component and the annotations that inherit @Component modified class). ——This is why Spring Boot’s startup classes are generally placed in the root path. This function is equivalent to specifying the scan path through context:component-scan in the Spring xml configuration. The role of the @Import annotation is to directly inject the specified component into the Spring container. @Import({Registrar.class}) is noted in the @AutoConfigurationPackage annotation. The Registrar class is used to save Spring Boot’s entry class, root path and other information.
4.3.5 SpringFactoriesLoader.loadFactoryNames method
@Import(AutoConfigurationImportSelector.class) means direct injection into AutoConfigurationImportSelector.
AutoConfigurationImportSelector has a core method getCandidateConfigurations for obtaining candidate configurations. This method calls the SpringFactoriesLoader.loadFactoryNames method, which is the key to Spring Boot SPI. It is responsible for loading all META-INF/spring.factories files, and the loading process is handled by SpringFactoriesLoader.
The META-INF/spring.factories file of Spring Boot is essentially a properties file, and the data content is a key-value pair.
The key source code of SpringFactoriesLoader.loadFactoryNames method:
// spring.factories 文件的格式为:key=value1,value2,value3
// 遍历所有 META-INF/spring.factories 文件
// 解析文件,获得 key=factoryClass 的类名称
public static List<String> loadFactoryNames(Class<?> factoryType, @Nullable ClassLoader classLoader) {
  String factoryTypeName = factoryType.getName();
  return loadSpringFactories(classLoader).getOrDefault(factoryTypeName, Collections.emptyList());
}

private static Map<String, List<String>> loadSpringFactories(@Nullable ClassLoader classLoader) {
  // 尝试获取缓存,如果缓存中有数据,直接返回
  MultiValueMap<String, String> result = cache.get(classLoader);
  if (result != null) {
    return result;
  }

  try {
    // 获取资源文件路径
    Enumeration<URL> urls = (classLoader != null ?
        classLoader.getResources(FACTORIES_RESOURCE_LOCATION) :
        ClassLoader.getSystemResources(FACTORIES_RESOURCE_LOCATION));
    result = new LinkedMultiValueMap<>();
    // 遍历所有路径
    while (urls.hasMoreElements()) {
      URL url = urls.nextElement();
      UrlResource resource = new UrlResource(url);
      // 解析文件,得到对应的一组 Properties
      Properties properties = PropertiesLoaderUtils.loadProperties(resource);
      // 遍历解析出的 properties,组装数据
      for (Map.Entry<?, ?> entry : properties.entrySet()) {
        String factoryTypeName = ((String) entry.getKey()).trim();
        for (String factoryImplementationName : StringUtils.commaDelimitedListToStringArray((String) entry.getValue())) {
          result.add(factoryTypeName, factoryImplementationName.trim());
        }
      }
    }
    cache.put(classLoader, result);
    return result;
  }
  catch (IOException ex) {
    throw new IllegalArgumentException("Unable to load factories from location [" +
        FACTORIES_RESOURCE_LOCATION + "]", ex);
  }
}
Summarizing the above methods, mainly do the following things:
Load all META-INF/spring.factories files, and SpringFactoriesLoader is responsible for the loading process.
- Search for all META-INF/spring.factories configuration files in the CLASSPATH.
- Then, parse the spring.factories file to get the fully qualified name of the specified autowired class.
4.3.6 Spring Boot’s AutoConfiguration class
Spring Boot has various starter packages, which can be obtained on demand according to actual project needs. In project development, as long as the starter package is introduced, we can obtain relevant capabilities with little or no configuration. Through the previous Spring Boot SPI process, only half of the automatic assembly work is completed, how to deal with the rest of the work?
Take the jar package of spring-boot-starter-web as an example, check its maven pom, you can see that it depends on spring-boot-starter, and all Spring Boot official starter packages will depend on this jar package. And spring-boot-starter depends on spring-boot-autoconfigure, and the secret of Spring Boot’s automatic assembly lies in this jar package.
Judging from the structure of the spring-boot-autoconfigure package, it has a META-INF/spring.factories, which obviously uses the Spring Boot SPI to automatically assemble the configuration classes in it.
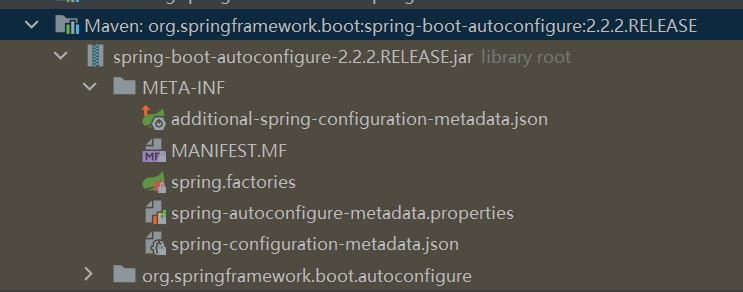
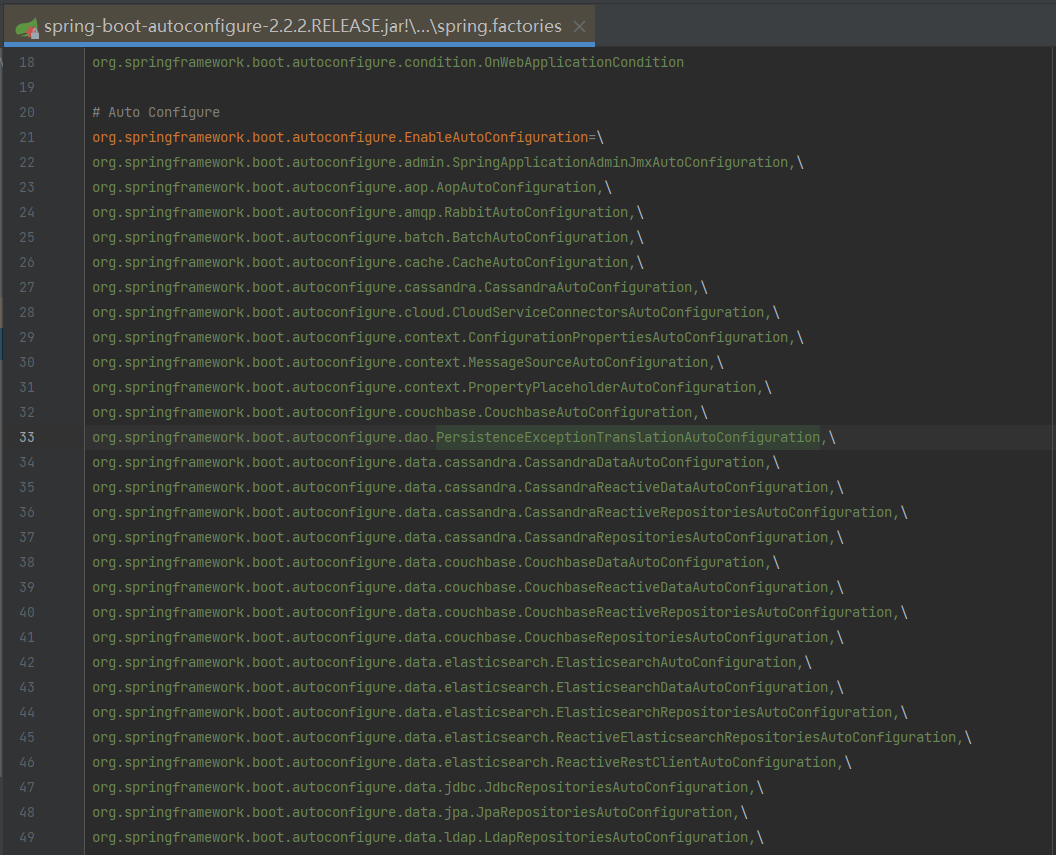
The figure below is part of the META-INF/spring.factories file of spring-boot-autoconfigure, where you can see a long list of AutoConfiguration classes that will be automatically loaded.
Taking RedisAutoConfiguration as an example, in this configuration class, it will decide whether to instantiate the corresponding Bean according to the conditions in @ConditionalXXX, and the important parameters that the instantiated Bean depends on are passed in through RedisProperties.
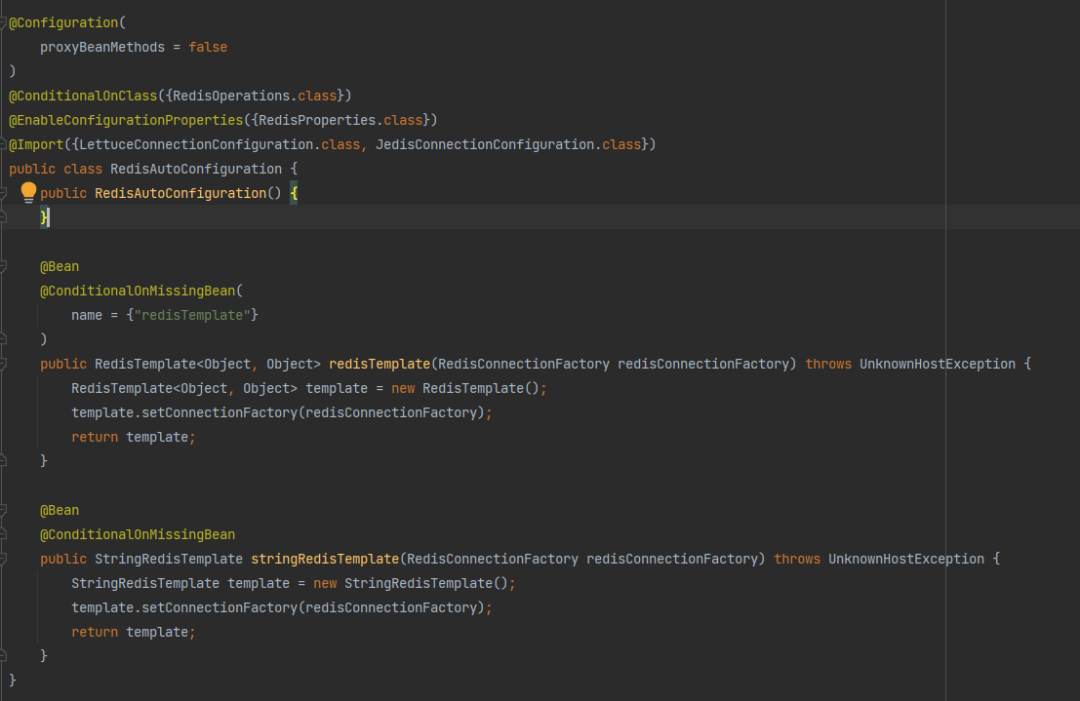
RedisProperties maintains the key properties required by the Redis connection. As long as the properties starting with spring.redis are specified in the yml or properties configuration file, they will be automatically loaded into the RedisProperties instance.

Through the above analysis, the principle of Spring Boot autoloading has been interpreted step by step.
Dubbo does not use Java SPI, but encapsulates a new SPI mechanism by itself. The configuration files required by Dubbo SPI need to be placed under the META-INF/dubbo path, and the configuration content is as follows:
optimusPrime = org.apache.spi.OptimusPrime
bumblebee = org.apache.spi.Bumblebee
Different from Java SPI implementation class configuration, Dubbo SPI is configured through key-value pairs, so that the specified implementation class can be loaded on demand. In addition to supporting on-demand loading of interface implementation classes, Dubbo SPI also adds features such as IOC and AOP.
5.1 ExtensionLoader entry
The relevant logic of Dubbo SPI is encapsulated in the ExtensionLoader class, and the specified implementation class can be loaded through ExtensionLoader.
The getExtension method of ExtensionLoader is its entry method, and its source code is as follows:
public T getExtension(String name) {
    if (name == null || name.length() == 0)
        throw new IllegalArgumentException("Extension name == null");
    if ("true".equals(name)) {
        // 获取默认的拓展实现类
        return getDefaultExtension();
    }
    // Holder,顾名思义,用于持有目标对象
    Holder<Object> holder = cachedInstances.get(name);
    if (holder == null) {
        cachedInstances.putIfAbsent(name, new Holder<Object>());
        holder = cachedInstances.get(name);
    }
    Object instance = holder.get();
    // 双重检查
    if (instance == null) {
        synchronized (holder) {
            instance = holder.get();
            if (instance == null) {
                // 创建拓展实例
                instance = createExtension(name);
                // 设置实例到 holder 中
                holder.set(instance);
            }
        }
    }
    return (T) instance;
}
It can be seen that the function of this method is: first check the cache, and if the cache misses, call the createExtension method to create an extension object. So, how createExtension creates an extension object, its source code is as follows:
private T createExtension(String name) {
    // 从配置文件中加载所有的拓展类,可得到“配置项名称”到“配置类”的映射关系表
    Class<?> clazz = getExtensionClasses().get(name);
    if (clazz == null) {
        throw findException(name);
    }
    try {
        T instance = (T) EXTENSION_INSTANCES.get(clazz);
        if (instance == null) {
            // 通过反射创建实例
            EXTENSION_INSTANCES.putIfAbsent(clazz, clazz.newInstance());
            instance = (T) EXTENSION_INSTANCES.get(clazz);
        }
        // 向实例中注入依赖
        injectExtension(instance);
        Set<Class<?>> wrapperClasses = cachedWrapperClasses;
        if (wrapperClasses != null && !wrapperClasses.isEmpty()) {
            // 循环创建 Wrapper 实例
            for (Class<?> wrapperClass : wrapperClasses) {
                // 将当前 instance 作为参数传给 Wrapper 的构造方法,并通过反射创建 Wrapper 实例。
                // 然后向 Wrapper 实例中注入依赖,最后将 Wrapper 实例再次赋值给 instance 变量
                instance = injectExtension(
                    (T) wrapperClass.getConstructor(type).newInstance(instance));
            }
        }
        return instance;
    } catch (Throwable t) {
        throw new IllegalStateException("...");
    }
}
The working steps of the createExtension method can be summarized as:
- Get all extension classes through getExtensionClasses
- Creating Extended Objects via Reflection
- Inject dependencies into extension objects
- Wrap the extension object in the corresponding Wrapper object
Among the above steps, the first step is the key to loading the extended class, and the third and fourth steps are the specific implementation of Dubbo IOC and AOP.
5.2 Get all extension classes
Before Dubbo obtains the extension class by name, it first needs to parse out the mapping relationship table from the extension item name to the extension class (Map
private Map<String, Class<?>> getExtensionClasses() {
    // 从缓存中获取已加载的拓展类
    Map<String, Class<?>> classes = cachedClasses.get();
    // 双重检查
    if (classes == null) {
        synchronized (cachedClasses) {
            classes = cachedClasses.get();
            if (classes == null) {
                // 加载拓展类
                classes = loadExtensionClasses();
                cachedClasses.set(classes);
            }
        }
    }
    return classes;
}
Here is also to check the cache first, and if the cache misses, lock it through synchronized. After locking, check the cache again and find it empty. At this time, if classes is still null, the extension class is loaded through loadExtensionClasses. The logic of the loadExtensionClasses method is analyzed below.
private Map<String, Class<?>> loadExtensionClasses() {
    // 获取 SPI 注解,这里的 type 变量是在调用 getExtensionLoader 方法时传入的
    final SPI defaultAnnotation = type.getAnnotation(SPI.class);
    if (defaultAnnotation != null) {
        String value = defaultAnnotation.value();
        if ((value = value.trim()).length() > 0) {
            // 对 SPI 注解内容进行切分
            String[] names = NAME_SEPARATOR.split(value);
            // 检测 SPI 注解内容是否合法,不合法则抛出异常
            if (names.length > 1) {
                throw new IllegalStateException("more than 1 default extension name on extension...");
            }

            // 设置默认名称,参考 getDefaultExtension 方法
            if (names.length == 1) {
                cachedDefaultName = names[0];
            }
        }
    }

    Map<String, Class<?>> extensionClasses = new HashMap<String, Class<?>>();
    // 加载指定文件夹下的配置文件
    loadDirectory(extensionClasses, DUBBO_INTERNAL_DIRECTORY);
    loadDirectory(extensionClasses, DUBBO_DIRECTORY);
    loadDirectory(extensionClasses, SERVICES_DIRECTORY);
    return extensionClasses;
}
The loadExtensionClasses method does two things in total, one is to parse the SPI annotations, and the other is to call the loadDirectory method to load the specified folder configuration file. The process of parsing SPI annotations is relatively simple, so there is no need to say more. Let’s take a look at what loadDirectory does.
private void loadDirectory(Map<String, Class<?>> extensionClasses, String dir) {
    // fileName = 文件夹路径 + type 全限定名
    String fileName = dir + type.getName();
    try {
        Enumeration<java.net.URL> urls;
        ClassLoader classLoader = findClassLoader();
        // 根据文件名加载所有的同名文件
        if (classLoader != null) {
            urls = classLoader.getResources(fileName);
        } else {
            urls = ClassLoader.getSystemResources(fileName);
        }
        if (urls != null) {
            while (urls.hasMoreElements()) {
                java.net.URL resourceURL = urls.nextElement();
                // 加载资源
                loadResource(extensionClasses, classLoader, resourceURL);
            }
        }
    } catch (Throwable t) {
        logger.error("...");
    }
}
The loadDirectory method first obtains all resource links through classLoader, and then loads resources through the loadResource method. Let’s go ahead and look at the implementation of the loadResource method.
private void loadResource(Map<String, Class<?>> extensionClasses,
  ClassLoader classLoader, java.net.URL resourceURL) {
    try {
        BufferedReader reader = new BufferedReader(
            new InputStreamReader(resourceURL.openStream(), "utf-8"));
        try {
            String line;
            // 按行读取配置内容
            while ((line = reader.readLine()) != null) {
                // 定位 # 字符
                final int ci = line.indexOf('#');
                if (ci >= 0) {
                    // 截取 # 之前的字符串,# 之后的内容为注释,需要忽略
                    line = line.substring(0, ci);
                }
                line = line.trim();
                if (line.length() > 0) {
                    try {
                        String name = null;
                        int i = line.indexOf('=');
                        if (i > 0) {
                            // 以等于号 = 为界,截取键与值
                            name = line.substring(0, i).trim();
                            line = line.substring(i + 1).trim();
                        }
                        if (line.length() > 0) {
                            // 加载类,并通过 loadClass 方法对类进行缓存
                            loadClass(extensionClasses, resourceURL,
                                      Class.forName(line, true, classLoader), name);
                        }
                    } catch (Throwable t) {
                        IllegalStateException e = new IllegalStateException("Failed to load extension class...");
                    }
                }
            }
        } finally {
            reader.close();
        }
    } catch (Throwable t) {
        logger.error("Exception when load extension class...");
    }
}
The loadResource method is used to read and parse configuration files, load classes through reflection, and finally call the loadClass method for other operations. The loadClass method is mainly used to operate the cache. The logic of this method is as follows:
private void loadClass(Map<String, Class<?>> extensionClasses, java.net.URL resourceURL,
    Class<?> clazz, String name) throws NoSuchMethodException {

    if (!type.isAssignableFrom(clazz)) {
        throw new IllegalStateException("...");
    }

    // 检测目标类上是否有 Adaptive 注解
    if (clazz.isAnnotationPresent(Adaptive.class)) {
        if (cachedAdaptiveClass == null) {
            // 设置 cachedAdaptiveClass缓存
            cachedAdaptiveClass = clazz;
        } else if (!cachedAdaptiveClass.equals(clazz)) {
            throw new IllegalStateException("...");
        }

    // 检测 clazz 是否是 Wrapper 类型
    } else if (isWrapperClass(clazz)) {
        Set<Class<?>> wrappers = cachedWrapperClasses;
        if (wrappers == null) {
            cachedWrapperClasses = new ConcurrentHashSet<Class<?>>();
            wrappers = cachedWrapperClasses;
        }
        // 存储 clazz 到 cachedWrapperClasses 缓存中
        wrappers.add(clazz);

    // 程序进入此分支,表明 clazz 是一个普通的拓展类
    } else {
        // 检测 clazz 是否有默认的构造方法,如果没有,则抛出异常
        clazz.getConstructor();
        if (name == null || name.length() == 0) {
            // 如果 name 为空,则尝试从 Extension 注解中获取 name,或使用小写的类名作为 name
            name = findAnnotationName(clazz);
            if (name.length() == 0) {
                throw new IllegalStateException("...");
            }
        }
        // 切分 name
        String[] names = NAME_SEPARATOR.split(name);
        if (names != null && names.length > 0) {
            Activate activate = clazz.getAnnotation(Activate.class);
            if (activate != null) {
                // 如果类上有 Activate 注解,则使用 names 数组的第一个元素作为键,
                // 存储 name 到 Activate 注解对象的映射关系
                cachedActivates.put(names[0], activate);
            }
            for (String n : names) {
                if (!cachedNames.containsKey(clazz)) {
                    // 存储 Class 到名称的映射关系
                    cachedNames.put(clazz, n);
                }
                Class<?> c = extensionClasses.get(n);
                if (c == null) {
                    // 存储名称到 Class 的映射关系
                    extensionClasses.put(n, clazz);
                } else if (c != clazz) {
                    throw new IllegalStateException("...");
                }
            }
        }
    }
}
As above, the loadClass method operates different caches, such as cachedAdaptiveClass, cachedWrapperClasses, cachedNames, and so on. Apart from that, there is no other logic in this method.
References
#Indepth #understanding #Java #SPI #source #code #level #vivo #Internet #Technology #News Fast Delivery